Snapshots
ResInsight has several commands to create snapshots conveniently. 3 commands to take snapshots of existing Plot and 3D Views directly, and a more advanced export command that can automatically modify Eclipse 3D Views before snapshotting them.
Snapshots of Existing Views
The commands to snapshot existing views and plots are available from the toolbar and the Edit and File->Export menus in the main windows
Snapshot to Clipboard
A snapshot of the active view is copied to the clipboard using Edit -> Copy Snapshot To Clipboard
 .
.
Snapshot to File
Image export of the currently active 3D View or Plot Window can be launched from File -> Export -> Snapshot To File
 .
.
Snapshot All Views/Plots to File
If a project contains multiple 3D Views or Plot Windows, all of them can be exported in one go using File -> Export -> Snapshot All Views To File
 . This will either export all the 3D Views or all the Plot Windows, depending on whether you invoke the command in the 3D Main Window or the Plot Main Window.
The files generated are stored in a folder named snapshots within the folder where the Project File resides.
Note
Snapshots of existing views can also be created and saved from the command line ( See Command Line Interface ).
Advanced Snapshot Export
The Advanced Snapshot Export
command is useful for exporting several images of a specified set of views while simultaneously changing some of their settings. By using this command it is easy to document all layers of a specific model, or generate images with identical setup across several different cases. It is also easy to export an image for each of the time steps in a case, or even a combination of all these parameters.
The Advanced Snapshot Export is available from the File->Export menu in the 3D Main Window Invoking the command will display the following dialog:
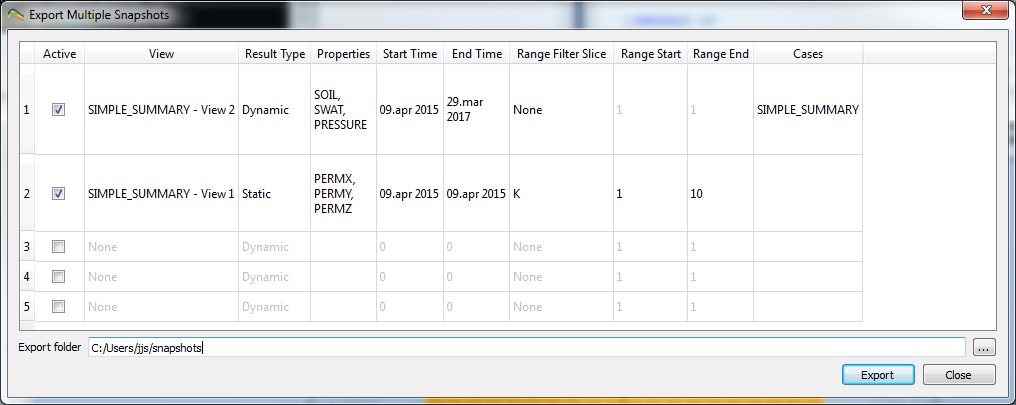
This table defines which 3D Views to modify, and how to modify them. Each row defines the modifications of a specific view, and for all the combinations a row specifies, a snapshot is generated.
To edit a row, the row must be activated by toggling it on in the Active column, then double click on the cell to edit.
Options represented by columns:
- View – Selects the view to modify.
- Result Type, Properties – Defines a list of simulation result properties to cycle through when creating snapshots. If properties from both the dynamic and static list is needed, you must create a new row.
- Start Time, End Time – Defines the time step range to cycle through when creating snapshots.
- Range Filter Slice, Range Start, Range End – Defines a range filter slice that will be added to the view, and then cycled from Range Start to Range End when creating snapshots.
- Cases – Defines the cases to cycle while creating snapshots. Normally you can not change which case a view is displaying, but this option does temporarily.
The number of exported snapshots from a row can easily end up being huge, so it is wise to use some caution. The total number will be Properties * Time Steps * Range Steps * Cases.
Rows can be deleted and created by right-clicking in the table. 5 rows are created for convenience by default.
The snapshots will be generated and saved to the folder displayed in the Export Folder field, when pressing the Export button. This might take quite some time, depending on you settings.