Eclipse Cases
ResInsight supports the following type of reservoir simulation input data:
*.GRIDand*.EGRIDfiles along with their*.INITand restart files*.XNNNand*.UNRST.- Grid and Property data from
*.GRDECLfiles.
Note
Release 2018.11 supports import of simulations from Intersect. To be able to import into ResInsight, the Intersect simulation must be exported into Eclipse file format.
Simulation Results
ResInsight offers several ways to import reservoir simulation grid files. Use one of the following commands in the File->Import->Eclipse Cases menu:
- Import Eclipse Case: Brings up the standard file selection dialog. Select
*.EGRIDor*.GRIDreservoir simulation files for import. Multiple selections are allowed. - Import Eclipse Cases Recursively: Brings up the recursive file selection dialog. This dialog is described in detail on the Summary Plots page.
- Import Eclipse Case (Time Step Filtered): See description
- Import Input Eclipse Case: See description
- Create Grid Case Group : Import a set of reservoir simulation files and places the cases in a grid case group See File Selection Dialog for how to import multiple files. All cases must have identical IJK to be part of a grid case group.
- Create Grid Case Ensemble : Import a set of reservoir simulation files and places the cases in a grid case ensemble. The grid models can have varying IJK resolution. If you have identical IJK for all cases, consider uting a Grid Case Group for reduced memory usage and improved performance.
Changing the grid case a view is connected to is described in 3D Views
The Reload Case command can be used to reload a previously imported case, to make sure it is up to date. This is useful if the grid or result files changes while a ResInsight session is active.
Note
You can select several grid files in one go by multiple selection of files (Ctrl + left mouse button, Shift + left mouse button).
Result Index File
If enabled, ResInsight will generate an index file when reading the simulation result files for the first time. This file will significantly reduce the time used to open the case next time. The file is named <casename>.RESINSIGHT_IDX
See Preferences: Behavior When Loading Data
Time Step Filtered Eclipse Result
Some reservoir simulation files have an enormous amount of time steps. If only a selection of the time steps really are needed for the session, the time steps can be filtered before loading. This can possibly speed up the import a great deal. Filtering can be done in the following way.
Select File->Import->Eclipse Cases->
 Import Eclipse Case (Time Step Filtered) and select an
 *.EGRID or *.GRID simulation file for import. A dialog will appear.
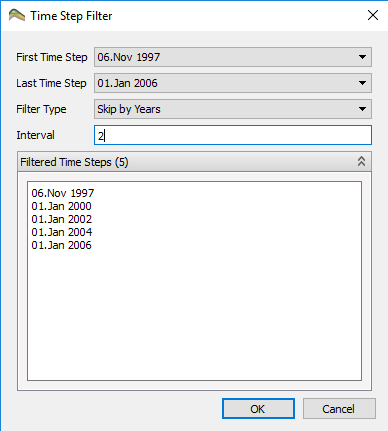
Filtering can be done by adjusting the following parameters:
- First and last time step
- Step filter type and with step interval size
First and last time step to include in the import can be chosen in their respective drop down list. All time steps found in the file are included in both lists.
Filter Type is set to All by default. This means that all time steps between the first and last chosen time step will be imported. The alternative to All is to skip time steps in a number of Days, Weeks, Months, Quarters or Years. The skipping interval is set in the text field below. After editing the Interval field, press tab to update the Filtered Time Steps preview, or click anywhere in the dialog. Click Ok to import when the filter is ready.
Filtering can also be done after import, in a case’s Property Window.
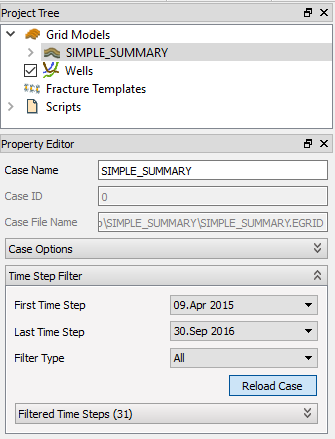
After clicking Reload Case, the time steps in the toolbar will be updated.
Eclipse ASCII Input Data
- Select File->Import->Eclipse Cases->
 Import Input Eclipse Case and select a
 *.GRDECLfile. - The case is imported, and a view of the case is created
- Right-click the Input Properties in the generated Input Case and use the right-click menu to import additional simulation property data files.
Appending additional properties to a binary case
If a binary or text reservoir simulation case is loaded, additional properties can be appended to this binary case. Make sure that the number of values in the GRDECL file matches the total number of cells in the binary case.
Appending Additional Properties
For export of currently selected cell result values to text file, see Export: Eclipse Properties
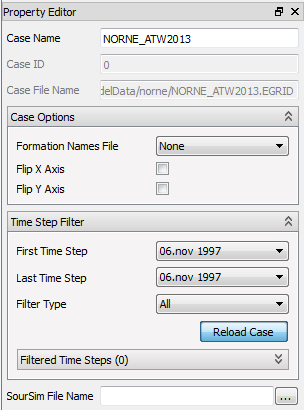
Handling Missing or Wrong MAPAXES
The X and Y grid data can be negated in order to make the Grid model appear correctly in ResInsight. This functionality is accessible in the Property Editor for all Eclipse Case types as the toggle buttons Flip X Axis and Flip Y Axis as shown in the example below.